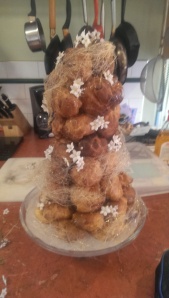
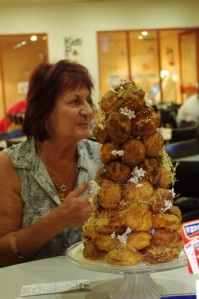
 For my Nan’s 70th birthday, I asked her about six months beforehand what kind of cake she would like. She went through a couple of my recipe books before she found this. Croquembouche. She said she’d always wanted one, and a major birthday like a 70th seemed like the perfect time to celebrate with the cake you really want.
So, a croquembouche is a French dessert, made from choux pastry profiteroles, filled with a creme patissiere, stacked into a cone shape and held together with spun sugar or toffee. The result is a very visually appealing, and incredibly delicious, dessert. The recipe isn’t too challenging, it is just time-consuming and requires full attention to get right. The challenge also lies in the fact that this dessert doesn’t store too well- unfilled profiteroles can be kept in an airtight container overnight, but once you start filling and assembling, it’s best eaten the same day. It’s also affected a lot by the humidity- I made it on a dreary spring day which wasn’t particularly beneficial, but these things can always be overcome.
This was my first attempt at choux pastry, and it actually turned out really well.
When you portion out the pastry onto baking sheets, you can use two spoons to lightly shape each portion into a ball. This will result in more even and attractive profiteroles after baking.
The creme patissiere is a bit of a challenge as it takes nothing less than total concentration, and ten seconds can be the difference between perfect and burnt. Don’t let it scare you- I was petrified but that just meant that I was hovering over it the whole time to make sure it didn’t burn, and so it didn’t. So as long as you don’t start until you can devote 100% attention to it, you should be fine 🙂
The recipe my nan had actually picked the croquembouche from called for a large, hollow metal cone, which you pile the profiteroles into so that the entire stack is made of profiteroles. However since there were only about 15 people coming to dinner, and the recipe called for about 400 profiteroles, it seemed a bit over the top. So I used a styrofoam cone, which I got from a craft store, covered in baking paper to prevent sticking, and with a circle of baking paper at the base to protect the cake stand, and stacked the profiteroles around the outside instead. Make a small hole in the base of each profiterole and pipe the creme patissiere into each one with 1cm tip piping nozzle. Once they’re all filled, prepare your toffee.
Be smarter about the toffee than I was. I caught myself on more than one occasion going to catch the drips of toffee from the spoon with my fingers. Could have ended disastrously, but as it was the most damage done was when I put the toffee pot onto a cutting board instead of a marble slab, melting a perfect circle into it. But, we live and we learn.
Once you’ve got all the components ready, assemble! You need to dip each profiterole into the toffee a little before placing it in the stack, to make them stick together. Unless you’ve got very steady hands, use tongs or a fork for this to avoid burns. I used my fingers without disaster, but it is the riskier way to go. Then just work your way around the cone, like you’re building a brick wall.
Once the entire cone is built, dip a fork into the toffee and swirl around the croquembouche to create threads of toffee to hold it together. I suggest putting down newspaper for this part. Then there are two ways to continue with the presentation of the croquembouche. You can continue swirling threads all over the croquembouche, which will create a net-like effect all over it. I wanted a slightly different look, so I place two wooden spoons about 50cm apart on the bench, with the handles hanging over the edge of the bench. I placed newspaper on the floor, then dipped the fork in the toffee and waved it back and forth over both the spoon handles so that all the strings turned into a long net. It’s difficult to describe, but you can see it on the final picture. Then you just pick up the net and position it spiralling up the croquembouche. You’ll need to do this a few times to get enough length to spiral the whole way up. Then you just decorate it any way you please. I just picked a few white potato-creeper flowers from our garden and positioned them the whole way up, however any flowers will look beautiful, especially something with a splash of colour.
Now when we got to the restaurant for the birthday dinner, the cooks kindly let us store it in the kitchen as a surprise. However, since my nan already knew this was what I’d been making, I had to tell her the entire thing had failed and so I’d just bought her a mud cake from Safeway. She seemed disappointed, but understanding. Which just made it all the better when the time came to light the sparklers and really surprise her.
I think she liked it 🙂 Which made all the hard work totally worth it. And that’s the best thing about making cakes, or croquembouche, or anything that’s going to be used as the centre of someone’s celebration: the look of sheer joy when they see it for the first time, and that they get to enjoy it. So I’m glad my nan had a wonderful birthday with the “cake” she’d always wanted.


